


![]()
Neben der korrekten Spannung der Antriebskette ist die Flucht essentiell für eine lange Lebensdauer des Sekundärtriebs…
…natürlich ist das noch nicht alles. Denn eine perfekt ausgerichtete Kette reduziert zudem Reibungsverluste zwischen Kette und Kettenrad/Ritzel und sorgt auch für einen idealen Leistungstransfer ans Hinterrad.
Wir haben bereits das Schwesterprodukt Chain Monkey (LINK) gleichen Herstellers vorgestellt, das eine hervorragende Hilfe für die schnelle und unkomplizierte Einstellung der Kettenspannung darstellt. Denn diese ist natürlich ebenfalls eine Grundvoraussetzung für ein perfektes Setup des Sekundärtriebs. Als weitere wichtige Maßnahme ist die Kettenflucht ein äußerst wichtiges Thema, das mit Hilfe des Laser Monkeys für den Anwender zu einer simplen Angelegenheit wird. Außerdem greifen beide Anwendungen ineinander, so dass wir hier den Anwendungsfall nochmal detailiert darstellen.
Was benötigt man für die Anwendung?
Zum einen das notwendige Werkzeug, um den vorhandenen Kettenschutz oberhalb der Schwinge zu demontieren und den passenden Schlüssel zum Lösen der Achsmutter am Hinterrad sowie zwei Gabelschlüssel für die Konter- und Einstellmutter der Kettenspanner an der Schwinge. Ein Kettenspray für die Schmierung der Antriebskette nach getaner Einstellarbeit versteht sich natürlich von selbst.
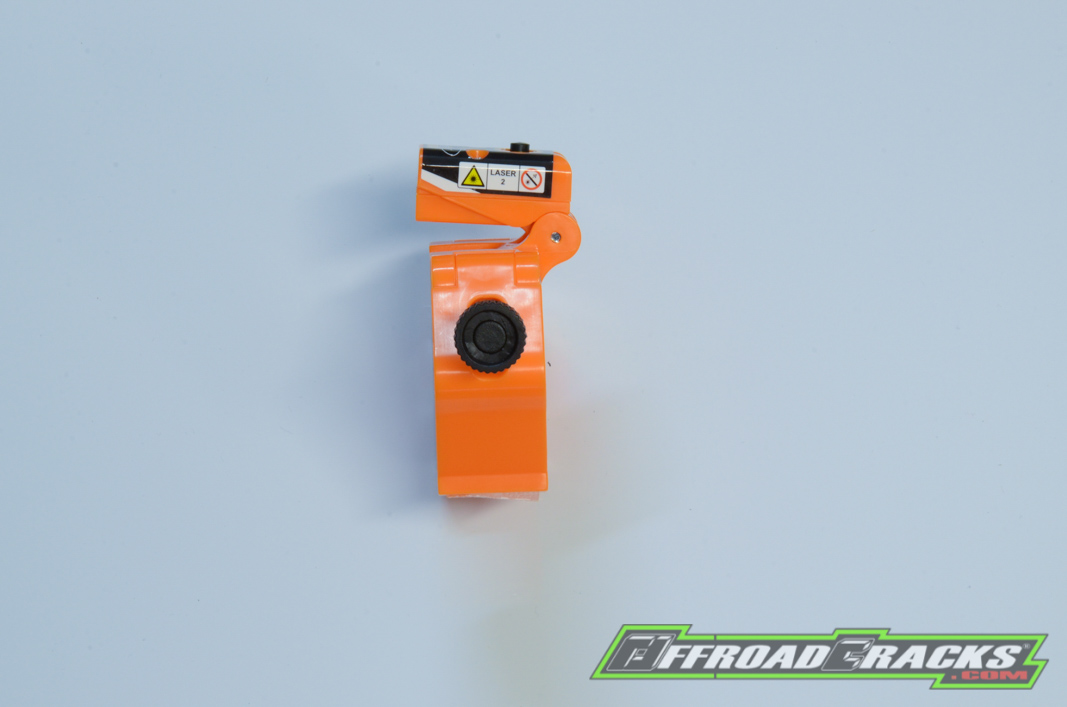
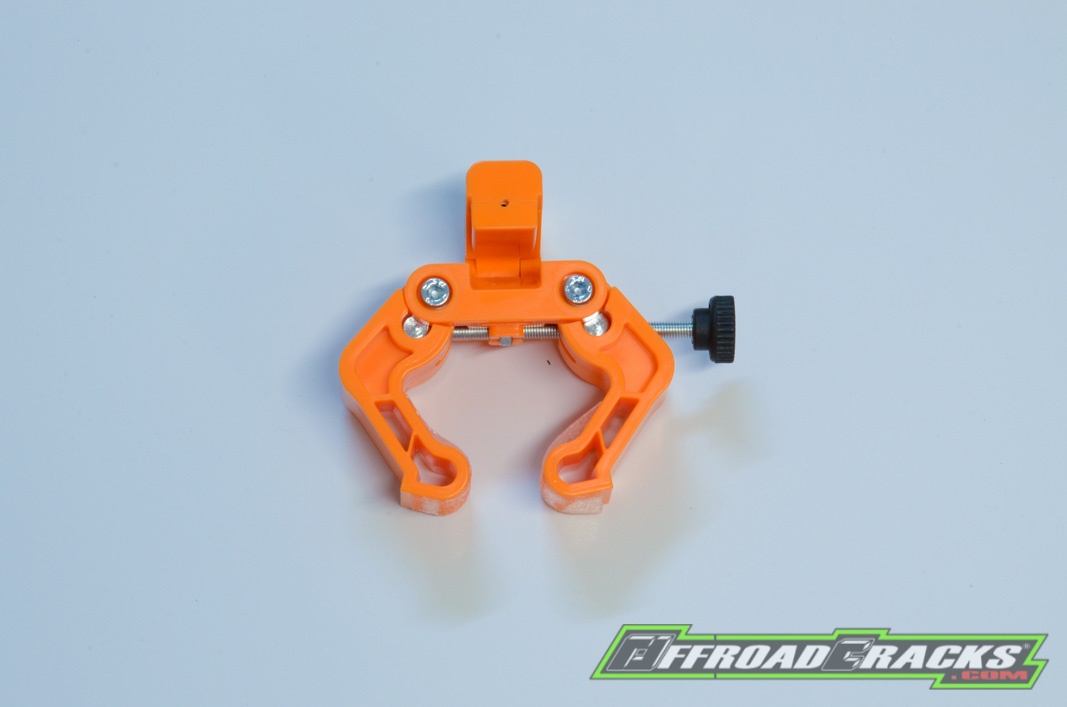
Anschließend werden die zwei im Lieferumfang befindlichen Knopfzellen in den Laserkopf eingesetzt, dessen Verschlussdeckel über drei Schrauben gesichert ist. Darin befindet sich der Laser mit einer Druckfeder, die die in Reihe geschalteten Knopfzellen in Position und Kontakt zueinander hält. Anschließend werden mittels Stellschraube der Abstand der Klemmfüße zueinander erweitert, um den Laser Monkey über die Antriebskette zu führen und anschließend über die Stege des Kettenrads klemmen zu können. Hierzu wird erneut in entgegengesetzter Richtung an der Stellschraube gedreht, so dass der Laser fest auf dem Kettenrad positioniert ist.
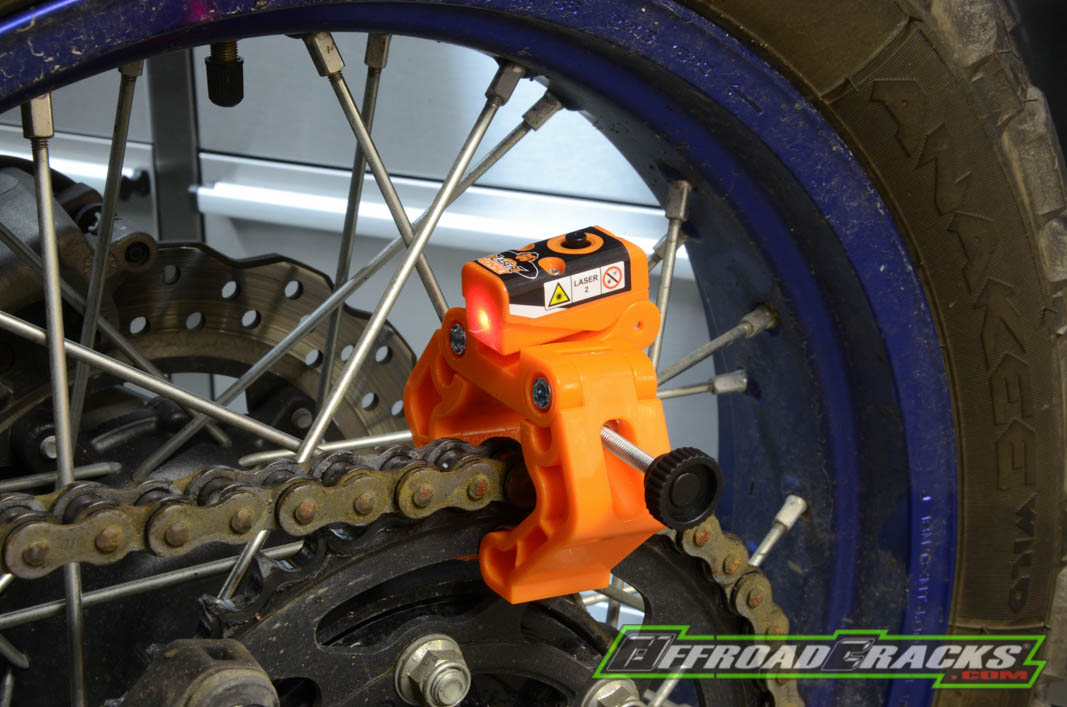
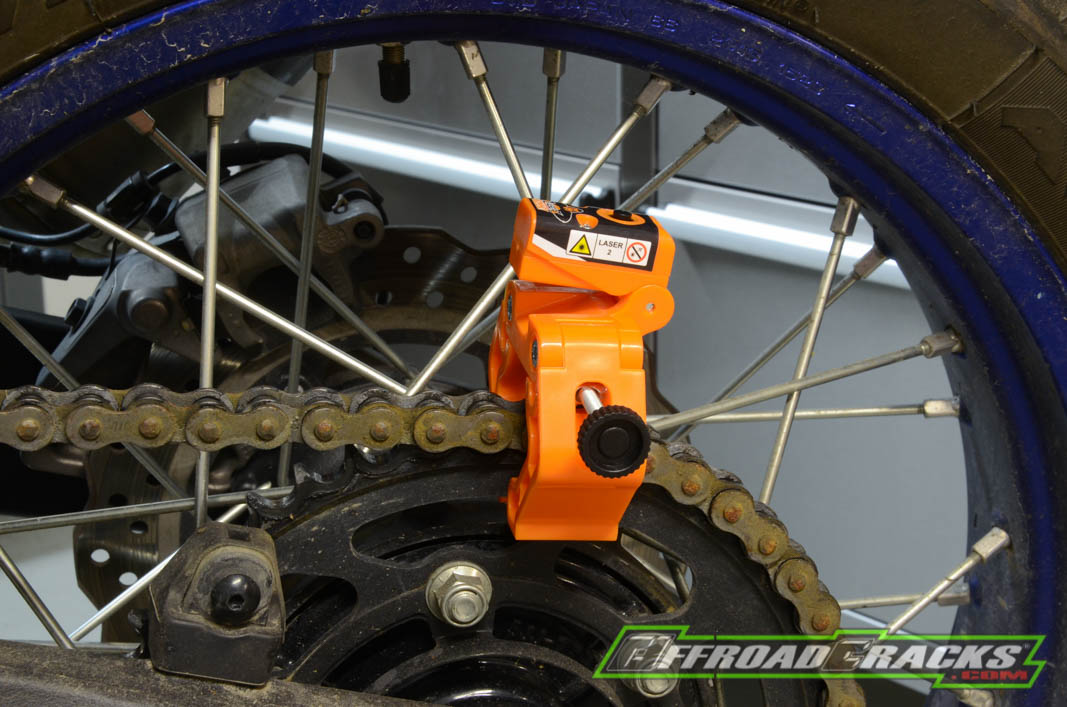
Die Klemmung erfolgt direkt am Kettenradträger
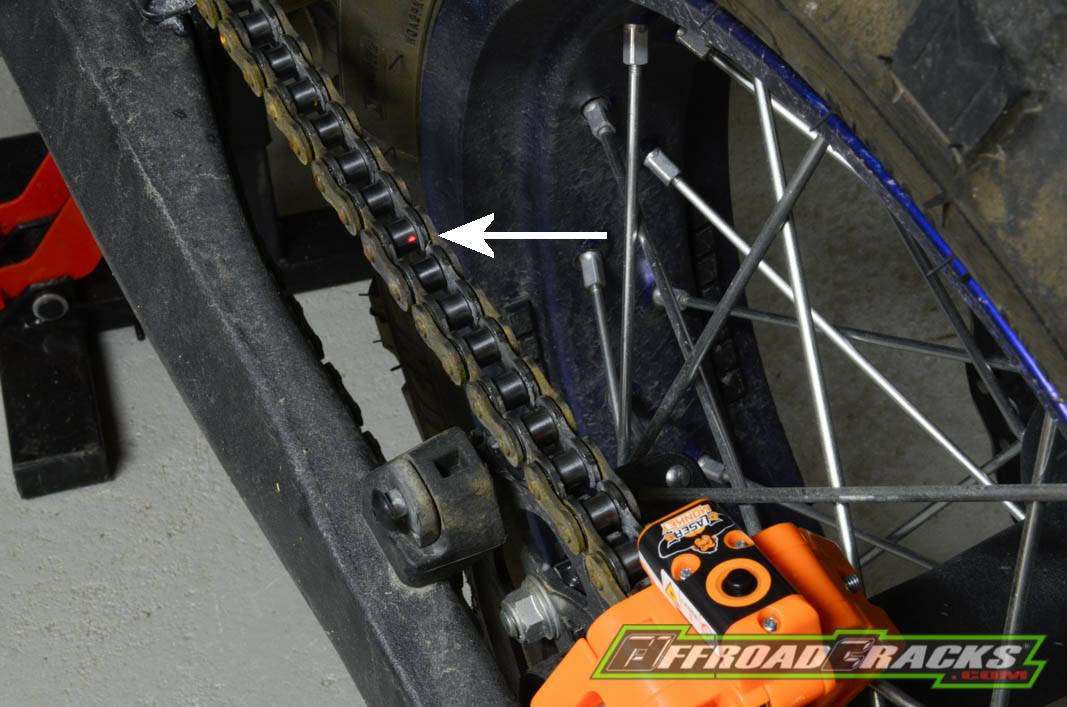
Nun wird der Laserkopf, der mittels zentraler Lagerung von oben nach unten gekippt werden kann passend ausgerichtet, so dass der Laserpunkt möglichst weit vom eigentlichen Montagepunkt weg auf der Kette in Richtung Ritzel zu sehen ist. Anschließend wird der Laserkopf nach unten bewegt, so dass der Laserpunkt möglichst nahe am Kettenrad zu finden ist. Dabei ist natürlich zu vergleichen, wie weit sich der Laserpunkt von letzter Position im Vergleich auf Höhe des Ritzels aus der Mitte heraus bewegt hat.
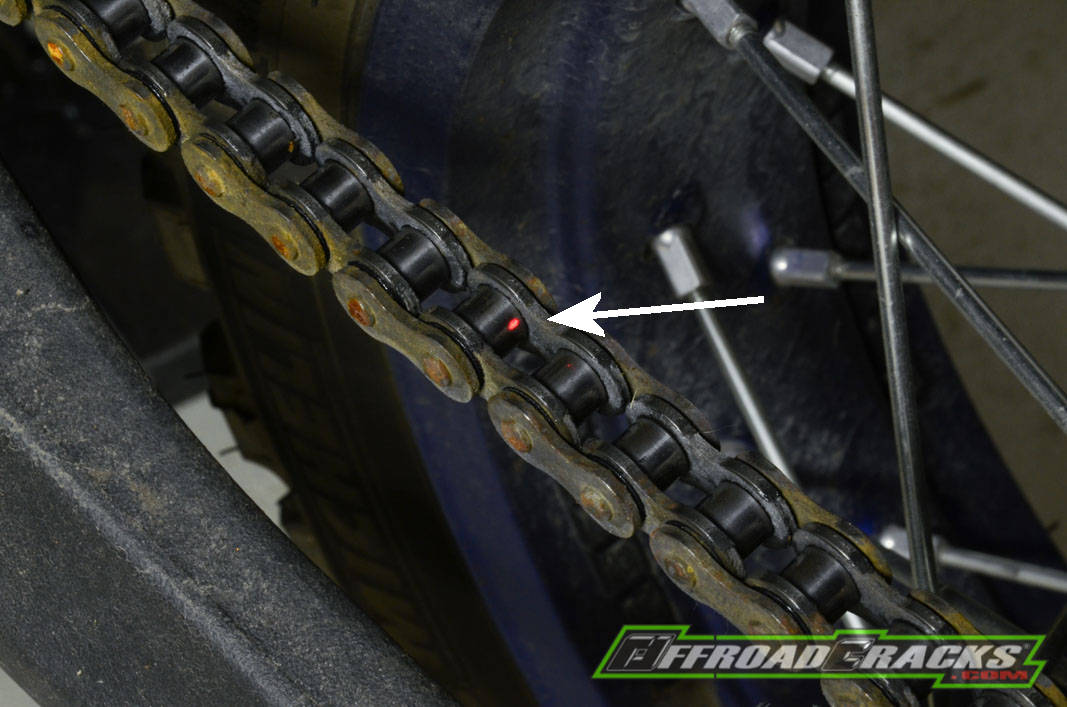
Dabei unterscheidet man zwei Fälle, die eine Einstellmaßnahme erfordern. Erster Fall: Befindet sich der Laserpunkt am linken Rand der Kette, so zeigt das Hinterrad in der Schwinge nach links. Um den Laserpunkt auf die gleiche Position wie kurz vor dem Kettenrad zu bringen, muss hierfür der Kettenspanner auf der rechten Schwingenseite entgegen der Fahrrichtung herausgedreht oder der linke Kettenspanner hineingedreht werden, bis sich der Laserpunkt auf der gewünschte Position auf der Kette befindet.
Zweiter Fall: Liegt der Laserpunkt am rechten Rand eines Kettenglieds, dann bedeutet das, dass das Hinterrad nach rechts zeigt und nicht mit dem Vorderrad fluchtet. Hier muss dann entweder der rechte Kettenspanner in Fahrrichtung hineingedreht oder der linke herausgedreht werden.
Eigentlich ist erst dann die korrekte Kettenspannung einzustellen, da anders herum man mit der Korrektur der Ketten- und Radflucht, die voreingestellte Kettenspannungen wieder verändert.
Mit dem beweglichen Laserkopf kann die Position direkt am Kettenrad aber auch auf Höhe des Ritzels festgestellt werden
Natürlich hat der Hersteller für diese Art der Einstellung Markierungen auf der Schwingenaußenseite angebracht. Leider sind diese Markierungen nicht selten schlecht sichtbar oder durch äußerliche Einflüsse im Offroad-Einsatz abgeschliffen, wofür der Laser Monkey eine hilfreiche Alternative darstellt.
Anschließend müssen die Kontermutter der Kettenspanner und die Achsmutter mit dem vom Hersteller vorgegeben Drehmoment festgeschraubt werden. Dann hat man wohl ein perfekt ausgerichtetes Hinterrad für einen optimalen, verschleißarmen und von minimalen Reibungsverlusten geplagten Sekundärtrieb am Start.
Der Laser Monkey stellt eine einfach Lösung für ein Problem in der Praxis dar, das zudem für einen geringen Anschaffungspreis zu bekommen ist. Die Verarbeitung geht in Ordnung und erfüllt voll und ganz ihren Zweck. Daher ist von unserer Seite der Laser Monkey uneingeschränkt empfehlenswert.
Einstellbarer Laser mit passender Leuchtkraft
BEZUGSQUELLEN

PREIS
- TRU TENSION Laser Monkey: 39,00 €
![]()
In addition to the correct tension of the drive chain, alignment is essential for a long life of the secondary drive …
… of course that’s not all. Because a perfectly aligned chain also reduces friction losses between the chain and the sprockets and also ensures ideal power transfer to the rear wheel.
We have already presented the sister product Chain Monkey (LINK) from the same manufacturer, which is an excellent support for the quick and easy adjustment of the chain tension. Because this is also a basic requirement for a perfect setup of the secondary drive. As a further important measure, the chain alignment is an extremely important topic, which with the help of the Laser Monkey becomes a simple job for the user. In addition, both applications interlock, so that we will present the application again in detail.
What do you need for the application?
On the one hand the necessary tool to dismantle the existing chain guard above the swing arm and the appropriate tool to loosen the axle nut on the rear wheel as well as two open-end wrenches for the lock and adjusting nut of the chain tensioner on the swing arm. A chain spray for the lubrication of the drive chain after the adjustment work has been done is of course self-evident.
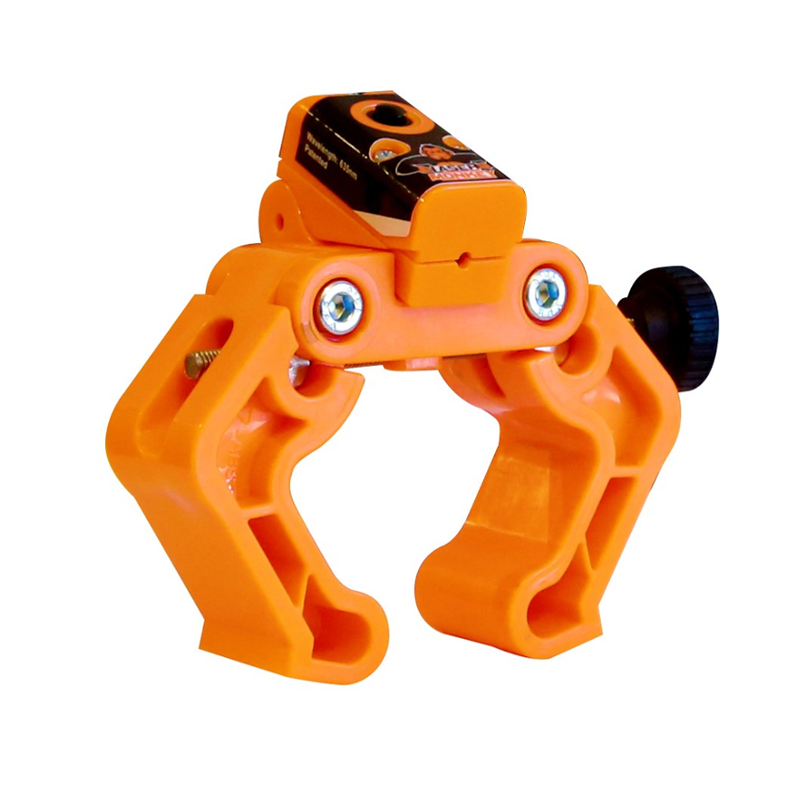
Then the two coin cells included in the scope of delivery are inserted into the laser head, the cover of which is secured with three screws. Inside is the laser with a compression spring that holds the button cells connected in series in position and in contact with one another. The spacing between the clamping feet is then increased by means of an adjusting screw so that the Laser Monkey can be guided over the drive chain and then clamped over the webs of the sprocket. To do this, turn the adjusting screw again in the opposite direction so that the laser is firmly positioned on the sprocket.
The clamping takes place directly on the sprocket carrier
Now the laser head, which can be tilted from top to bottom by means of a central bearing, is appropriately aligned so that the laser point can be seen as far away as possible from the actual assembly point on the chain in the direction of the sprocket. The laser head is then moved downwards so that the laser point can be found as close as possible to the chain wheel. It is of course necessary to compare how far the laser point has moved from the last position compared to the level of the pinion from the center.
A distinction is made between two cases that require adjustment. First case: If the laser point is on the left edge of the chain, the rear wheel in the swing arm points to the left. In order to bring the laser point to the same position as just in front of the chain wheel, the chain tensioner on the right side of the swing arm must be turned out against the riding direction or the left chain tensioner must be turned in until the laser point is in the desired position on the chain.
Second case: If the laser point is on the right edge of a chain link, this means that the rear wheel is pointing to the right and is not aligned with the front wheel. Here either the right chain tensioner must be turned in in the riding direction or the left one must be unscrewed.
Actually, the correct chain tension needs to be set after the adjustment fo the right wheel alignment.
With the movable laser head, the position can be determined directly on the chain wheel but also at the level of the sprocket
Of course, the manufacturer has made markings on the outside of the swing arm for this type of adjustment. Unfortunately, these markings are often poorly visible or worn off by external influences in off-road use, for which the Laser Monkey is a helpful alternative.
Then the lock nut of the chain tensioner and the axle nut must be tightened with the torque specified by the manufacturer. Then you have a perfectly aligned rear wheel for an optimal, low-wear secondary drive that is plagued by minimal friction losses.
The Laser Monkey is a simple solution to a problem in practice that is also available for a low purchase price. The processing is fine and fully fulfills its purpose. Therefore, the Laser Monkey is unreservedly recommended from our side.
Adjustable laser with suitable luminosity
SUPPLIER
PRICE
- TRU TENSION Chain Monkey: 39,00 €


: FULL RACES 450 1,2 &3!")
 ist raus, Toby Price (KTM) führt!")
